How to use Aquafertz — the complete PPS-Pro dosing guide
Everything you need to know about PPS-Pro dosing for your planted tank. This guide covers mixing your aquarium plant fertiliser, light-level dosing, reading plant deficiencies, water changes, and why chelated iron DTPA outperforms standard EDTA in most UK tanks.
Lay everything out before you start mixing
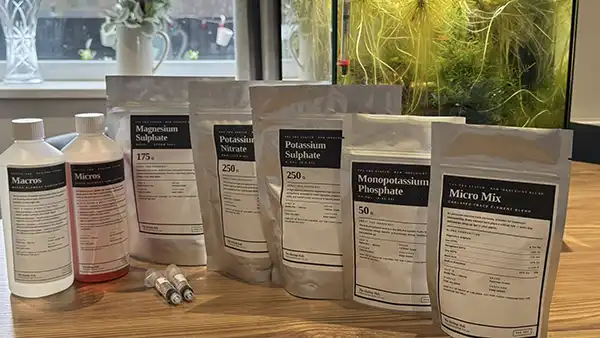
Open the full PPS-Pro kit and you’ll find five labelled compound packs, two 500ml mixing bottles, and two syringes. Check everything is there before you start.
The compounds are: Potassium Nitrate, Monopotassium Phosphate, Potassium Sulphate, Magnesium Sulphate, and Micro Mix. The first four are your macronutrients — they all go into one bottle together. The Micro Mix goes into the second bottle on its own.
Before you begin, it helps to have:
- The two 500ml bottles and syringes from the kit
- Tap water — or RO/distilled if you have it (better for the micro bottle)
- A marker pen to label and date your bottles
Add the aquarium plant fertiliser compounds, fill with water
Macro bottle: pour all four macro compound packs in, fill to 500ml with water, screw the lid on, and shake for 30–60 seconds. The solution should turn mostly clear.
Micro bottle: pour the Micro Mix in, fill to 500ml, and shake well. This one may stay slightly coloured — that’s the chelated iron, completely normal.
Let both bottles rest for 12–24 hours before first use to allow everything to fully dissolve and settle.
PPS-Pro dosing — once daily, before lights come on
PPS-Pro is a daily dosing system. Draw up the right amount from each bottle using the syringe and add it to your tank — ideally first thing in the morning, just before the lights switch on. Dose the macro bottle first, then the micro bottle.
The standard starting dose is 1ml of each bottle per 10 litres for medium/high light tanks. Halve it for low-light setups, double it for very high light with CO₂ injection.
Dose daily. Water change when TDS rises.
That’s the whole routine. Every day, dose both bottles. One of PPS-Pro’s advantages is that large routine water changes aren’t required — instead, you do a 50% change when your TDS reading tells you nutrient levels are building up.
When a compound runs low — usually the Potassium Nitrate first — pick it up individually from our aquarium fertiliser compounds page and top up your macro bottle. No need to replace everything at once.
PPS-Pro dosing guide — how much aquarium plant fertiliser should I use?
Your dose scales with how hard your plants are working — primarily determined by light intensity and whether you’re running CO₂. Use the table below as your starting point and adjust based on how your plants respond.
| Light Level | Macro (ml / 10L / day) | Micro (ml / 10L / day) | Water Changes |
|---|---|---|---|
| Low Light | 0.5 ml | 0.25 ml | 50% weekly (optional) |
| Medium / High | 1.0 ml | 0.5 ml | 50% when TDS rises |
| Very High | 2.0 ml | 1.0 ml | 50% when TDS rises |
Doses are per 10 litres, dosed daily. A 100 litre medium-light tank = 10ml macro + 5ml micro per day.
Quick reference — medium/high light planted tanks
Standard PPS-Pro dose (1.0ml macro + 0.5ml micro per 10L, daily). Halve for low-light; double for very high light.
| Tank Size | Macro (ml / day) | Micro (ml / day) |
|---|---|---|
| 30 litres | 3 ml | 1.5 ml |
| 60 litres | 6 ml | 3 ml |
| 100 litres | 10 ml | 5 ml |
| 150 litres | 15 ml | 7.5 ml |
| 200 litres | 20 ml | 10 ml |
| 300 litres | 30 ml | 15 ml |
When should I change the water in a PPS-Pro planted tank?
One of PPS-Pro’s key advantages is that large, scheduled water changes aren’t required. A simple TDS meter monitors nutrient accumulation — and you only change water when the reading tells you to.
Example: if your tap water reads 300 µS, change 50% when the tank reaches 400 µS. This prevents nutrient build-up while keeping maintenance to a minimum. A basic TDS pen costs a few pounds and is well worth keeping beside your tank.
New growth looking pale?
This usually indicates a micronutrient or iron deficiency. Try increasing your micro dose slightly, or check that your water pH is in a range where iron remains available. New leaves are affected first because iron is immobile in plants.
Algae starting to appear?
Algae is rarely caused by too many nutrients alone — it’s almost always an imbalance. Check your CO₂ stability first; fluctuating CO₂ is the most common cause. If CO₂ is consistent, reduce your dose slightly and check whether your light period needs shortening.
Reading aquarium plant deficiencies — what your leaves are telling you
Plants show deficiencies in their leaves before anything else. The single most useful thing to observe is whether symptoms are appearing on older leaves or new growth — mobile nutrients show deficiency in old leaves first; immobile nutrients show in new growth first.
| Nutrient | What you’ll see | What to do |
|---|---|---|
| Nitrogen (N) | Yellowing from the midvein outwards, overall pale growth | Increase macro dose; check KNO₃ levels |
| Phosphorus (P) | Reddish or purple leaf edges, poor root development | Increase macro dose |
| Potassium (K) | Yellowing leaf margins, pinholes in older leaves, curling tissue | Increase macro dose; buy Potassium Sulphate individually |
| Magnesium (Mg) | Pale older leaves with greener veins remaining | Increase macro dose; buy Magnesium Sulphate individually |
| Calcium (Ca) | Deformed or pale new leaves, stunted growing tips | Usually a water issue — add a GH booster if using RO water |
| Iron (Fe) | Yellow new leaves with green veins still visible (interveinal chlorosis) | Increase micro dose; check pH is below 7.5 |
Old leaves affected → mobile nutrient (N, P, K, Mg). New leaves affected → immobile nutrient (Fe, Ca). That one observation narrows the diagnosis considerably.
Why we use Iron DTPA in our aquarium plant fertiliser
Iron is critical for aquatic plants but quickly becomes insoluble in water. Chelation keeps it dissolved and available. There are three chelate types commonly used in aquarium fertilisers, and they’re not interchangeable.
The most common chelate in basic fertiliser mixes. Affordable but loses stability rapidly above pH 6.5 — largely ineffective in most planted aquariums which run at neutral or slightly above.
A stronger chelate that remains fully available up to pH 7.5 — covering the vast majority of UK planted tanks. The right balance of effectiveness and cost for everyday use.
Used in AquafertzThe most powerful iron chelate — stable even in highly alkaline water. Best reserved for tanks with a pH consistently above 7.5, or persistent iron deficiency unresolved by DTPA.
PPS-Pro dosing FAQ — your questions answered
The questions we get asked most often about PPS-Pro and Aquafertz, answered properly.
No — never. The iron in the micro bottle reacts with phosphate from the macro bottle and forms an insoluble precipitate. Both nutrients become unavailable to your plants. Always keep them in separate bottles and dose them separately.
Not on a fixed schedule, no. PPS-Pro is designed around TDS monitoring rather than routine water changes. Do a 50% change when your tank TDS rises more than 100 µS above your tap water baseline. In many tanks this might be every 3–4 weeks rather than every week.
It’s optional but beneficial, particularly for the micro bottle. Chelated trace elements are more temperature-sensitive than the macro salts — keeping the micro bottle in the fridge extends its shelf life. The macro bottle is fine at room temperature in a cool, dark place.
Doses scale linearly with tank volume. The base rate is 1ml macro + 0.5ml micro per 10 litres per day (medium/high light). For a 250 litre tank that’s 25ml macro + 12.5ml micro daily. Halve everything for low-light or shrimp tanks; double for very high light with CO₂ injection.
Yes. The Aquafertz Micro Mix is copper-free and safe for shrimp and other invertebrates. The stable, low daily dosing approach of PPS-Pro also avoids the sudden spikes in water chemistry that stress invertebrates.
First, check whether it’s old leaves or new leaves that are affected. Old leaves = mobile nutrient deficiency (N, P, K, or Mg) — increase your macro dose. New leaves = immobile nutrient issue (iron or calcium) — increase your micro dose or check your pH is below 7.5. If algae is appearing at the same time, check your CO₂ stability before adjusting nutrients.
No. Each compound in the macro bottle is available to buy individually from the compounds page. Just add the required amount of whichever compound has run low directly to your macro bottle and top up with water if needed.
PPS-Pro works with or without CO₂, but the dose should reflect it. Without CO₂ injection, use the low-light dose (0.5ml macro / 0.25ml micro per 10L) even if your lighting is moderate. CO₂ is the main driver of plant growth rate, and nutrients should always be scaled to match growth.
Yes. Simply halve all the compound amounts and mix to 250ml instead of 500ml. The nutrient ratios remain exactly the same, and the daily dosing amounts stay identical. This is a good option for smaller tanks where a full 500ml bottle would take a very long time to use up.
The macro bottle supplies nitrogen, phosphorus, potassium, and magnesium — needed in relatively large quantities for growth and cellular function. The micro bottle delivers trace elements including chelated iron, manganese, zinc, boron, and molybdenum — needed in very small amounts but equally essential for chlorophyll synthesis and nutrient transport.
Why PPS-Pro is the best aquarium plant fertiliser method for most hobbyists
There are dozens of fertiliser methods out there. PPS-Pro has stood the test of time for one reason: it’s designed to maintain stable, low nutrient levels — which keeps algae under control and plants consistently well-nourished, without demanding much of the keeper.
Rather than dosing a large amount at once, PPS-Pro tops up nutrients in small daily amounts — preventing the spikes and crashes that trigger algae growth and stress livestock.
PPS-Pro doesn’t require regular water chemistry testing. A basic TDS meter is the only monitoring tool you need — and even that’s optional once you’ve found your rhythm.
The low, consistent dosing approach is one of the reasons PPS-Pro is popular with shrimp keepers. No sudden spikes, no chemical crashes — just stable, predictable water chemistry day to day.
Get your aquarium plant fertiliser kit today
Everything in this guide comes in the box. Order the full PPS-Pro kit and you’ll be set up by the end of the day.
